
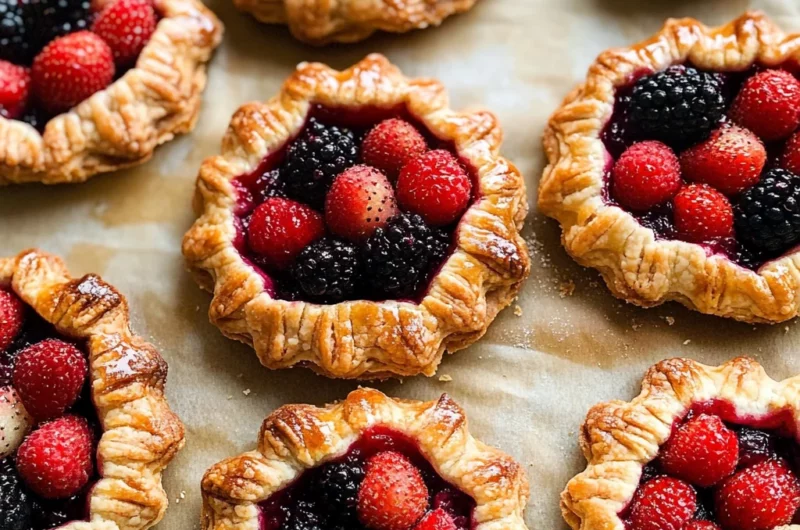
Using pie dough and a simple fruit filling, you can create Mini Fruit Galettes that are perfectly portioned and fun to serve as an alternative to a full pie or galette. These delightful treats are versatile enough for any occasion, from casual family dinners to elegant gatherings. With their flaky crust and sweet fruit filling, they’re sure to impress your guests while being easy to prepare.
Why You’ll Love This Recipe
- Easy to Prepare: The straightforward steps make this recipe accessible for bakers of all skill levels.
- Versatile Filling Options: Use mixed berries or other fruits of your choice for a personalized touch.
- Perfect Portions: Mini galettes are ideal for serving guests, ensuring everyone gets their own treat.
- Make Ahead Friendly: You can prepare the dough in advance and store it in the fridge until you’re ready to bake.
- Serve Warm or Cold: Enjoy them fresh out of the oven or as a delicious chilled dessert.
Tools and Preparation
Before you start making your Mini Fruit Galettes, gather your tools and set up your workspace. Having everything organized will make the process smoother.
Essential Tools and Equipment
- Rolling pin
- Cookie cutter (5.5 or 6 inches)
- Baking sheets
- Parchment paper or silicone baking mats
- Mixing bowls
Importance of Each Tool
- Rolling pin: Essential for evenly rolling out the pie dough without tearing it.
- Cookie cutter: Provides uniformity in size for your galettes, ensuring even baking.
- Baking sheets: Necessary for holding multiple galettes during baking without crowding.
Ingredients
To make these delicious Mini Fruit Galettes, you’ll need the following ingredients:
- Flaky Pie Crust or All Butter Pie Crust dough (either recipe makes enough dough for this)
- 2 and 1/2 cups (about 350-400g) mixed berries or other fruit (see note)
- 1 Tablespoon (8g) cornstarch
- 2 Tablespoons (25g) granulated sugar
- 1 teaspoon lemon juice or vanilla extract
- 2 Tablespoons (30ml) whole milk, for brushing
- optional for topping: coarse sugar and/or chopped/sliced nuts
How to Make Mini Fruit Galettes
Step 1: Prepare the Pie Dough
Make sure your pie dough is prepared before you begin. It’s best to make it the night before since it needs to chill in the refrigerator for at least 2 hours before using.
Step 2: Line Your Baking Sheets
Line two large baking sheets with parchment paper or silicone baking mats. Ensure there’s enough room in your refrigerator for these sheets because the shaped galettes must chill later.
Step 3: Prepare the Fruit Filling
In a medium bowl, gently stir together the berries, cornstarch, sugar, and lemon juice/vanilla until combined. Place this mixture in the refrigerator until you’re ready to fill the galettes.
Step 4: Roll Out the Dough
Working with one chilled pie dough at a time, place it onto a floured surface. Roll it into a large 12-inch circle. Cut out rounds using a cookie cutter or a bowl rim that is about 5.5–6 inches wide. You should get about five rounds per pie crust.
Step 5: Fill the Dough Rounds
Arrange the dough rounds on prepared baking sheets. Spoon about 1/4 cup of the fruit filling into the center of each round, leaving excess juice behind. Fold the edges over gently while keeping the center exposed.
Step 6: Brush with Milk
Brush the edges of each galette with milk to help them brown nicely. If desired, sprinkle with coarse sugar or sliced nuts for extra texture.
Step 7: Chill Before Baking
Chill the shaped galettes in the refrigerator for at least 20 minutes (up to 4 hours). This step helps maintain their shape while baking.
Step 8: Preheat Your Oven
As you approach finishing chilling time, preheat your oven to 375°F (191°C).
Step 9: Bake Your Galettes
Bake chilled galettes for about 25–28 minutes or until their edges are lightly browned.
Step 10: Cool and Serve
Remove from oven and let cool for at least five minutes before enjoying them warm or at room temperature. Serve them plain or with ice cream or whipped cream if desired.
Step 11: Store Leftovers
Cover leftover mini galettes and store them in the refrigerator for up to five days.
Now you’re ready to enjoy these delightful Mini Fruit Galettes!
How to Serve Mini Fruit Galettes
Mini fruit galettes are a delightful treat that can be served in various ways, enhancing their appeal for any occasion. Whether you’re hosting a gathering or enjoying a quiet night in, these servings suggestions will elevate your dessert experience.
With Fresh Whipped Cream
- Adding a dollop of homemade whipped cream gives the galettes a light, airy texture and delicious creaminess.
A Scoop of Ice Cream
- Pairing mini fruit galettes with vanilla or berry-flavored ice cream creates a perfect balance between warm and cold.
Drizzled with Honey
- A drizzle of honey adds natural sweetness and complements the fruit filling without overpowering it.
Served with Fruit Compote
- Accompany the galettes with a side of warm fruit compote for an extra burst of flavor and moisture.
Garnished with Mint Leaves
- Fresh mint leaves not only add color but also provide a refreshing contrast to the sweetness of the galettes.
Enjoyed Plain
- Sometimes less is more! Enjoy these mini treats as they are to savor their delicious flavors fully.

How to Perfect Mini Fruit Galettes
To achieve the best results with your mini fruit galettes, consider these helpful tips that ensure perfect flavor and presentation every time.
- Use Cold Dough: Keeping your pie dough chilled before baking helps prevent it from becoming too soft, which maintains its structure.
- Avoid Overfilling: Adding too much fruit filling can cause the galettes to leak during baking; stick to about 1/4 cup per galette.
- Chill Before Baking: Allowing the shaped galettes to chill for at least 20 minutes before baking helps them hold their shape and results in flakier crusts.
- Experiment with Fruits: Don’t limit yourself to just berries; try peaches, apples, or even stone fruits for varied flavors.
- Brush Well: Brushing the edges with milk not only enhances browning but also adds an appealing shine to your finished galettes.
- Monitor Bake Time: Keep an eye on your mini fruit galettes as they bake; every oven is different, so adjust the time as necessary.
Best Side Dishes for Mini Fruit Galettes
Pairing side dishes with mini fruit galettes can enhance your dessert spread. Here are some excellent options you can consider serving alongside these delightful treats.
- Cheese Platter: A selection of soft cheeses like brie or goat cheese complements the sweetness of the galettes beautifully.
- Mixed Green Salad: A light salad dressed in vinaigrette provides a refreshing contrast to the richness of the dessert.
- Roasted Nuts: Serve lightly salted roasted nuts for added crunch that pairs well with sweet flavors.
- Chocolate Sauce: A drizzle of chocolate sauce offers an indulgent touch that chocolate lovers will appreciate.
- Savory Scones: Cheddar or herb scones add a savory element that balances out the sweetness of the galettes.
- Fruit Salad: A colorful fruit salad can enhance freshness while echoing the flavors found within the mini fruit galettes.
- Yogurt Parfait: Layered yogurt with granola and berries makes for a delightful contrast in texture and temperature.
- Coffee or Tea: A warm beverage pairs perfectly, providing comfort alongside this sweet treat.
Common Mistakes to Avoid
When making Mini Fruit Galettes, it’s easy to overlook a few key steps. Avoid these common mistakes to ensure your galettes turn out perfectly.
- Not chilling the dough: Chilling the pie dough is essential for flaky crusts. Make sure to refrigerate it for at least two hours before rolling.
- Using too much filling: Overfilling can cause the galettes to burst in the oven. Stick to about 1/4 cup of filling for each galette.
- Skipping the chill after shaping: If you don’t chill the formed galettes, they may lose their shape while baking. Always refrigerate them for at least 20 minutes.
- Rolling the dough too thin: Thin dough can become tough and hard to handle. Aim for about 1/8-inch thickness when rolling out your pie crust.
- Neglecting to brush with milk: Brushing the edges with milk ensures a beautiful golden color. Don’t skip this step for a stunning finish!
Storage & Reheating Instructions
Refrigerator Storage
- item Store mini fruit galettes in an airtight container.
- item They will last up to 5 days in the refrigerator.
Freezing Mini Fruit Galettes
- item Wrap each galette tightly in plastic wrap.
- item Place them in a freezer-safe bag or container for up to 3 months.
Reheating Mini Fruit Galettes
- Oven: Preheat your oven to 350°F (175°C) and heat for about 10-15 minutes until warm.
- Microwave: Heat individually on medium power for about 30 seconds, but this may soften the crust.
- Stovetop: Use a skillet over low heat, covering it with a lid for about 5 minutes until warmed through.
Frequently Asked Questions
How do I make gluten-free Mini Fruit Galettes?
You can use gluten-free pie crust instead of traditional pie dough. Many stores offer ready-made options or you can make your own using gluten-free flour blends.
Can I use frozen fruit for Mini Fruit Galettes?
Yes, frozen fruit works well! Just be sure to thaw and drain any excess liquid before mixing with cornstarch and sugar.
What fruits are best for Mini Fruit Galettes?
While mixed berries are popular, you can use apples, peaches, or even stone fruits. Choose seasonal fruits for optimal flavor.
How do I prevent soggy bottoms on my Mini Fruit Galettes?
To avoid sogginess, ensure you chill the shaped galettes and pre-bake any wet fillings slightly before assembling.
Can I customize my Mini Fruit Galettes?
Absolutely! Feel free to experiment with different fruits or add spices like cinnamon or nutmeg for extra flavor.
Final Thoughts
Mini Fruit Galettes are not only delicious but also versatile. Their charming presentation makes them perfect for gatherings or a cozy night in. Customize them with your favorite fruits and toppings, and enjoy this delightful dessert that’s sure to impress!

Mini Fruit Galettes
- Total Time: 58 minutes
- Yield: Makes about 5 mini fruit galettes 1x
Description
Mini Fruit Galettes are delightful, individual-sized pastries that are perfect for any occasion. With a flaky pie crust enveloping a sweet fruit filling, these charming desserts offer an impressive yet easy-to-make treat for gatherings or quiet family dinners. Whether you opt for mixed berries or seasonal fruits, each galette brings a burst of flavor and elegance to your table. These mini desserts are not only visually appealing but also customizable, allowing you to express your culinary creativity. Serve them warm with a scoop of ice cream or enjoy them chilled for a refreshing treat.
Ingredients
- Flaky Pie Crust (or All Butter Pie Crust)
- 2 and 1/2 cups mixed berries (or other fruits)
- 1 tablespoon cornstarch
- 2 tablespoons granulated sugar
- 1 teaspoon lemon juice (or vanilla extract)
- 2 tablespoons whole milk (for brushing)
Instructions
- Prepare the pie dough ahead of time and chill in the refrigerator for at least 2 hours.
- Preheat your oven to 375°F (191°C).
- Roll out the dough and cut it into rounds.
- Mix your fruit with cornstarch, sugar, and lemon juice.
- Fill each dough round with fruit mixture and fold edges over.
- Brush with milk and chill shaped galettes for 20 minutes before baking.
- Bake for 25-28 minutes until golden brown.
- Prep Time: 30 minutes
- Cook Time: 28 minutes
- Category: Dessert
- Method: Baking
- Cuisine: American
Nutrition
- Serving Size: 1 serving
- Calories: 210
- Sugar: 10g
- Sodium: 150mg
- Fat: 9g
- Saturated Fat: 4g
- Unsaturated Fat: 4g
- Trans Fat: 0g
- Carbohydrates: 29g
- Fiber: 2g
- Protein: 3g
- Cholesterol: 15mg


