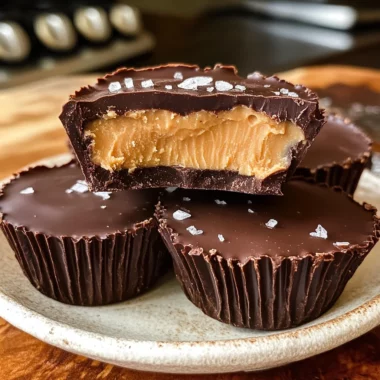
Classic Homemade Reese’s are the perfect blend of creamy peanut butter and rich milk chocolate, making them an irresistible treat for any occasion. These delightful candies are not only easy to make but also offer a nostalgic taste that everyone loves. Whether you’re preparing for a party, a family gathering, or simply want to satisfy your sweet tooth, this recipe is sure to impress with its simple ingredients and delicious flavor.
Why You’ll Love This Recipe
- Quick and Easy: With just a few simple steps, you can whip up these treats in no time.
- Decadent Flavor: The combination of creamy peanut butter and smooth chocolate creates an unforgettable flavor experience.
- Customizable: Feel free to add toppings or mix-ins like crushed nuts or sprinkles to personalize your candies.
- Perfect for Sharing: These candies are great for gifts or dessert tables, making them a hit at any event.
- Kid-Friendly: A fun recipe kids can help with; rolling the balls is perfect for little hands!
Tools and Preparation
To create your Classic Homemade Reese’s, you’ll need some basic kitchen tools. Having the right equipment makes the process smoother and more enjoyable.
Essential Tools and Equipment
- Mixing bowl
- Measuring cups
- Electric mixer (optional)
- Baking sheet
- Parchment paper
- Microwave-safe bowl
Importance of Each Tool
- Mixing bowl: Essential for combining all ingredients thoroughly.
- Parchment paper: Prevents sticking and makes cleanup easy when setting your candies.
Ingredients
For this delicious recipe, you’ll need the following ingredients to make Classic Homemade Reese’s:
For the Peanut Butter Filling
- 1 cup creamy peanut butter
- 1/4 cup unsalted butter, softened
- 1 teaspoon vanilla extract
- 2 cups powdered sugar
For the Chocolate Coating
- 2 cups milk chocolate chips
- 1 tablespoon coconut oil (optional)
How to Make Classic Homemade Reese’s
Step 1: Prepare the Peanut Butter Mixture
- In a mixing bowl, combine creamy peanut butter, unsalted butter, and vanilla extract. Mix until smooth.
- Gradually add in powdered sugar, stirring until the mixture is firm enough to hold its shape.
Step 2: Shape the Candies
- Roll the peanut butter mixture into 1-inch balls or press it into mini muffin liners for uniform shapes.
- Chill the formed balls in the refrigerator until firm, about 30 minutes.
Step 3: Melt the Chocolate Coating
- In a microwave-safe bowl, melt milk chocolate chips with coconut oil, stirring every 30 seconds until smooth.
Step 4: Dip the Candies
- Remove chilled peanut butter balls from the refrigerator.
- Dip each ball into the melted chocolate coating, ensuring it’s fully coated.
- Place dipped candies on a baking sheet lined with parchment paper.
Step 5: Set and Serve
- Refrigerate again for 20–30 minutes until the chocolate coating sets completely.
- Once set, serve your Classic Homemade Reese’s and enjoy!
These delightful homemade treats are sure to bring joy to anyone who tries them!
How to Serve Classic Homemade Reese’s
Classic Homemade Reese’s are a delightful treat that can be enjoyed in various ways. Whether you’re hosting a party or simply indulging yourself, these candies can be served in fun and creative manners.
On a Dessert Platter
- Arrange the candies on a colorful platter for an eye-catching display.
- Combine them with other treats like brownies or cookies for variety.
As Party Favors
- Place individual candies in small clear bags tied with ribbon.
- These make great take-home gifts for guests at parties or celebrations.
With Ice Cream
- Serve alongside a scoop of vanilla or chocolate ice cream.
- The combination of creamy textures creates a delicious dessert experience.
In Baking Recipes
- Chop the candies and use them as mix-ins for cookies or brownies.
- They add a rich peanut butter and chocolate flavor to your baked goods.
As Toppings
- Crumble over cupcakes or cakes for added flair.
- The contrasting textures of crunchy chocolate and smooth frosting enhance any dessert.

How to Perfect Classic Homemade Reese’s
To achieve the best results with Classic Homemade Reese’s, follow these helpful tips.
- Use quality ingredients: High-quality chocolate and peanut butter will significantly enhance the flavor of your candies.
- Chill before dipping: Ensure the peanut butter mixture is cold before dipping it into chocolate for easier handling.
- Experiment with chocolate types: Feel free to try dark or white chocolate for different flavor profiles.
- Adjust sweetness: If you prefer less sweetness, reduce the amount of powdered sugar in the filling.
- Ensure even coating: Dip each peanut butter ball into the melted chocolate thoroughly to achieve an even layer.
Best Side Dishes for Classic Homemade Reese’s
Pairing side dishes with Classic Homemade Reese’s can elevate your dessert experience. Here are some delightful options to consider.
- Fruit Salad: A refreshing mix of seasonal fruits balances the richness of the candy.
- Cheese Platter: Include a variety of cheeses; sharp flavors contrast well with sweet treats.
- Chocolate Fondue: Serve alongside fresh fruits and marshmallows for dipping, creating an interactive dessert experience.
- Nut Mix: A blend of salted nuts provides a crunchy texture that complements the smoothness of Reese’s.
- Coffee or Tea: Hot beverages like coffee or herbal tea pair nicely, enhancing the overall flavor profile of the candies.
- Yogurt Parfait: Layer yogurt with granola and berries—this light option contrasts beautifully with the heavy candy.
Common Mistakes to Avoid
Making Classic Homemade Reese’s can be simple, but a few common mistakes can ruin your candy-making experience. Here are some pitfalls to watch out for:
- Not measuring ingredients accurately: Precision is key in candy making. Use measuring cups and spoons to ensure the right ratios.
- Skipping the chilling step: Chilling the peanut butter mixture is essential for proper shaping. Don’t rush it; let them chill to firm up.
- Overheating chocolate: Melt chocolate carefully to avoid burning. Use low heat and stir frequently for a smooth consistency.
- Using the wrong type of peanut butter: Stick with creamy peanut butter for the best results. Natural peanut butter may lead to a crumbly texture.
- Neglecting storage tips: Proper storage is crucial for freshness. Store your candies in an airtight container to maintain their flavor and texture.
Storage & Reheating Instructions
Refrigerator Storage
- Store Classic Homemade Reese’s in an airtight container.
- They can last up to 1 week when refrigerated.
- Place parchment paper between layers if stacking, to prevent sticking.
Freezing Classic Homemade Reese’s
- Freeze candies in a single layer on a baking sheet before transferring them to a container.
- They can be frozen for up to 3 months.
- Use a freezer-safe bag or container to keep them fresh.
Reheating Classic Homemade Reese’s
- Oven: Preheat your oven to 250°F (120°C) and place Reese’s on a baking sheet for about 5 minutes until slightly warm.
- Microwave: Heat for 10-15 seconds at low power. Check frequently to avoid melting too much.
- Stovetop: Use a double boiler on low heat, stirring gently until warmed through.
Frequently Asked Questions
If you have questions about making Classic Homemade Reese’s, you’re not alone! Here are some common inquiries:
Can I use dark chocolate instead of milk chocolate?
Yes, you can use dark chocolate if you prefer a richer flavor. It provides a delicious twist!
How do I know when the chocolate has melted enough?
The chocolate should be smooth and shiny without any lumps. Stir frequently while melting.
Can I make these without coconut oil?
Absolutely! Coconut oil helps with consistency but is not necessary. Just melt the chocolate directly without it.
What if my peanut butter mixture is too soft?
If it’s too soft, add more powdered sugar gradually until it firms up enough to roll into balls or press into molds.
How do I customize my Classic Homemade Reese’s?
You can add crushed nuts, sprinkle sea salt on top, or incorporate other flavors like vanilla or cinnamon into the filling!
Final Thoughts
Classic Homemade Reese’s are not just delicious; they are also customizable and fun to make! You can play around with different chocolates or add mix-ins like crushed pretzels or nuts for added texture and flavor. Try this easy recipe today and impress your friends and family with your homemade treats!

Classic Homemade Reese’s
- Total Time: 25 minutes
- Yield: Approximately 24 servings 1x
Description
Indulge in the delightful taste of Classic Homemade Reese’s, a perfect treat for any occasion! This easy recipe combines creamy peanut butter and rich milk chocolate to create irresistible candies that are sure to bring back sweet memories. Whether you’re hosting a party or simply satisfying a craving, these homemade treats are simple to make and can be customized with your favorite toppings. With just a few basic ingredients and straightforward steps, you’ll impress family and friends alike. Enjoy the nostalgic flavor of Classic Homemade Reese’s today!
Ingredients
- 1 cup creamy peanut butter
- 1/4 cup unsalted butter, softened
- 1 teaspoon vanilla extract
- 2 cups powdered sugar
- 2 cups milk chocolate chips
- 1 tablespoon coconut oil (optional)
Instructions
- In a mixing bowl, mix the creamy peanut butter, unsalted butter, and vanilla extract until smooth. Gradually stir in powdered sugar until firm enough to shape.
- Roll the mixture into 1-inch balls or press into muffin liners. Chill for about 30 minutes.
- Melt chocolate chips with coconut oil in a microwave-safe bowl, stirring every 30 seconds until smooth.
- Dip each chilled peanut butter ball in melted chocolate, covering completely, then place on parchment-lined baking sheet.
- Refrigerate for another 20-30 minutes until set.
- Prep Time: 15 minutes
- Cook Time: 10 minutes
- Category: Dessert
- Method: No-Bake
- Cuisine: American
Nutrition
- Serving Size: 1 serving
- Calories: 107
- Sugar: 9g
- Sodium: 50mg
- Fat: 6g
- Saturated Fat: 3g
- Unsaturated Fat: 2g
- Trans Fat: 0g
- Carbohydrates: 11g
- Fiber: 0g
- Protein: 2g
- Cholesterol: 5mg