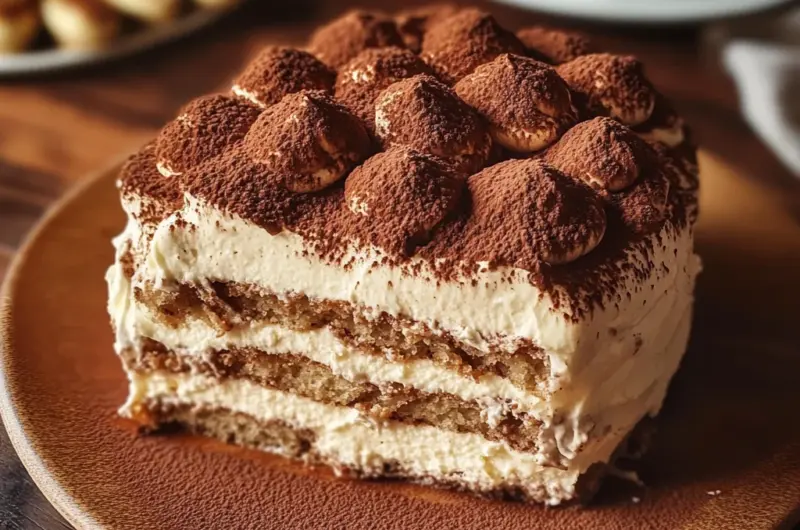
This No-bake Tiramisu Layer Cake is a delightful dessert that brings together the classic flavors of tiramisu without the need for baking. Perfect for special occasions or casual gatherings, this cake is layered with rich mascarpone cream and coffee-soaked ladyfingers, making it a favorite among coffee lovers and dessert enthusiasts alike. Its creamy texture and elegant appearance make it a showstopper on any table.
Why You’ll Love This Recipe
- Easy to Prepare: No baking means less time in the kitchen and more time enjoying delicious cake!
- Flavorful Layers: The combination of coffee and mascarpone creates a rich, indulgent taste that will impress your guests.
- Customizable: Feel free to adjust the liqueur or even omit it for a family-friendly version.
- Perfect for Any Occasion: Whether it’s a birthday, holiday, or just a weekday treat, this cake fits right in.
- Make-Ahead Convenience: Prepare it the night before to allow flavors to meld, making your day-of serving effortless.
Tools and Preparation
Before diving into this delicious recipe, gather your tools to ensure a smooth preparation process.
Essential Tools and Equipment
- 20-cm springform pan
- Electric hand mixer
- Mixing bowls (various sizes)
- Spatula
- Knife or offset spatula
- Sieve (for dusting cocoa powder)
- Plastic wrap
Importance of Each Tool
- Springform Pan: This allows easy removal of your cake without damaging its structure.
- Electric Hand Mixer: Whips eggs and cream quickly, achieving the perfect consistency without much effort.
- Spatula: Essential for smoothing out layers and transferring the cake to a serving plate.
Ingredients
- 250 grams ladyfingers
- 1-2 cups strong coffee (cold from the fridge)
- 500 grams mascarpone cheese (well drained and firm, at room temperature)
- 150 grams sweetened heavy whipping cream
- 2 egg yolks
- 1 egg white
- 100 grams granulated sugar
- 1 dash of Marsala wine (liqueur of your choice, or vanilla extract)
- 2 tablespoons unsweetened cocoa powder
How to Make No-bake Tiramisu Layer Cake
Step 1: Prepare the Coffee
Make 1-2 cups of strong coffee and put it in the refrigerator to cool completely. This will be used later for soaking the ladyfingers.
Step 2: Separate Eggs
Separate the yolks from the egg whites.
Step 3: Whip Egg White
In a small bowl, use an electric hand mixer with whisk attachment to whip one egg white with 40 grams of sugar on medium speed until stiff peaks form. Set aside.
Step 4: Whip Egg Yolks
In another bowl, whip the egg yolks with the remaining sugar until thick. It should drizzle slowly from a spoon. Set aside.
Step 5: Prepare Mascarpone Mixture
In a large bowl, whip the mascarpone cheese with Marsala wine (or vanilla extract) until creamy. Set aside.
Step 6: Whip Heavy Cream
In another bowl, whip heavy cream using an electric mixer until very firm. Gently fold this whipped cream into the mascarpone mixture.
Step 7: Combine Mixtures
Slowly pour in the whipped egg yolk mixture into the mascarpone/cream mixture while gently folding it in until fully mixed.
Step 8: Add Egg White
Gently fold in the whipped egg whites from step three into the mascarpone mixture until well blended but not deflated.
Step 9: Assemble Cake Base
Take out your springform pan and pour cooled coffee into a bowl for dipping ladyfingers. Quickly dip both sides of each ladyfinger into coffee before arranging them on the bottom of the springform pan.
Step 10: Layer Cream Mixture
Spread a layer of mascarpone cream mixture over the ladyfinger base using a clean knife or spatula.
Step 11: Repeat Layers
Continue adding layers by repeating steps nine and ten until all ingredients are used. Reserve leftover cream covered in plastic wrap for decoration later.
Step 12: Chill
Cover with plastic wrap and refrigerate for at least six hours or overnight.
Step 13: Remove from Pan
Carefully trace around the cake edges with a knife to loosen it before removing the springform top.
Step 14: Transfer Cake
Use an offset spatula to carefully slide under the cake layer and transfer it onto a serving plate. If it’s too soft, freeze for about thirty minutes first.
Step 15: Decorate Top
Using a pastry bag filled with reserved filling from earlier, decorate the top by piping dollops evenly across.
Step 16: Dust Cocoa Powder
Dust cocoa powder over top using a sieve for an elegant finish.
Step 17: Serve
Cut into individual slices and serve immediately for best enjoyment!
Enjoy your delicious No-bake Tiramisu Layer Cake!
How to Serve No-bake Tiramisu Layer Cake
Serving your No-bake Tiramisu Layer Cake is a delightful experience that can be enhanced with a few creative touches. Whether it’s a family dinner or a special occasion, here are some serving ideas that will make your dessert stand out.
Classic Presentation
- Chilled Slices: Serve slices straight from the fridge for a refreshing treat on warm days.
- Cocoa Dusting: Dust the top with cocoa powder right before serving for an elegant touch.
Accompaniments
- Espresso Shots: Pair each slice with a small cup of espresso to complement the coffee flavors.
- Fresh Berries: Add a handful of fresh raspberries or strawberries on the side for a fruity contrast.
Garnishes
- Chocolate Shavings: Top each slice with dark chocolate shavings for added richness.
- Mint Leaves: A few fresh mint leaves can add a pop of color and freshness to your plate.
Themed Platter
- Dessert Board: Create a dessert platter featuring mini pastries, fruit, and the tiramisu cake for variety.
- Coffee Creamer Station: Set up flavored creamers beside the cake for guests who want to enhance their coffee experience.

How to Perfect No-bake Tiramisu Layer Cake
To achieve the best results with your No-bake Tiramisu Layer Cake, consider these helpful tips. They will ensure that your cake turns out beautifully every time.
- Use Stale Ladyfingers: Using slightly stale ladyfingers helps them absorb coffee without becoming too soggy.
- Chill Thoroughly: Allow the cake to chill overnight for the best flavor and texture; this helps layers meld together.
- Be Gentle When Folding: When incorporating whipped cream and egg whites, fold gently to maintain airiness.
- Room Temperature Ingredients: Ensure mascarpone cheese is at room temperature for easier mixing and a smoother texture.
- Adjust Sweetness: Taste the mascarpone mixture before layering; adjust sugar according to your preference.
- Decorate Wisely: Use a pastry bag for decorating the top evenly; it adds elegance to your presentation.
Best Side Dishes for No-bake Tiramisu Layer Cake
Pairing side dishes with your No-bake Tiramisu Layer Cake can elevate the dessert experience. Here are some complementary options that work well together.
- Affogato: A scoop of vanilla ice cream topped with hot espresso creates a delightful coffee combination.
- Panna Cotta: This creamy Italian custard adds a smooth contrast to the rich tiramisu flavors.
- Fruit Salad: A light and refreshing fruit salad balances out the cake’s heaviness, making it an ideal side.
- Chocolate Mousse: Rich and airy, chocolate mousse offers another layer of indulgence alongside tiramisu.
- Savory Cheese Platter: Include various cheeses such as mascarpone and aged gouda for an intriguing flavor pairing.
- Almond Biscotti: Crunchy biscotti complements the soft textures of tiramisu while adding extra flavor dimensions.
Common Mistakes to Avoid
Making a No-bake Tiramisu Layer Cake can be simple, but there are common pitfalls. Here are some mistakes to watch out for:
- Ignoring the coffee temperature: If your coffee is too hot, it can make the ladyfingers soggy. Always cool it completely before dipping.
- Not properly whipping the cream: If the heavy cream isn’t whipped until firm, your cake may not hold its shape. Ensure it’s whipped to stiff peaks.
- Overmixing the egg whites: Be gentle when folding in the egg whites. Overmixing can deflate your mixture and lead to a denser cake.
- Skipping refrigeration time: Allowing the cake to chill for at least 6 hours is crucial for better flavor and texture. Don’t rush this step!
- Using stale ladyfingers: Fresh ladyfingers absorb coffee better, enhancing the cake’s overall taste. Check that they’re fresh before using.
Storage & Reheating Instructions
Refrigerator Storage
- Store leftovers in an airtight container.
- The cake lasts up to 3 days in the fridge.
- Keep it covered with plastic wrap to maintain moisture.
Freezing No-bake Tiramisu Layer Cake
- Wrap individual slices tightly in plastic wrap.
- Freeze for up to 2 months without losing flavor.
- Thaw overnight in the refrigerator before serving.
Reheating No-bake Tiramisu Layer Cake
- Oven: Preheat to 350°F (175°C) and warm for 10-15 minutes.
- Microwave: Use low power and heat for 20-30 seconds for each slice.
- Stovetop: Place on a pan over low heat, cover, and warm gently until just thawed.
Frequently Asked Questions
Here are some frequently asked questions about making a No-bake Tiramisu Layer Cake.
Can I make a vegan version of No-bake Tiramisu Layer Cake?
Yes! Substitute mascarpone cheese with vegan cream cheese and use aquafaba instead of eggs.
How long does No-bake Tiramisu Layer Cake last?
The cake can be stored in the refrigerator for up to 3 days or frozen for up to 2 months.
Is it necessary to use Marsala wine?
While traditional recipes call for Marsala wine, you can substitute it with vanilla extract or omit it altogether if preferred.
Can I use espresso instead of regular coffee?
Absolutely! Using espresso will provide a richer flavor that enhances your No-bake Tiramisu Layer Cake.
How do I serve No-bake Tiramisu Layer Cake?
Serve chilled, garnished with cocoa powder or chocolate shavings on top for an elegant presentation.
Final Thoughts
The No-bake Tiramisu Layer Cake is a delightful dessert that combines rich flavors and creamy textures without any baking required. Its versatility allows you to customize it by adding different liqueurs or toppings. Give this recipe a try; it’s sure to impress your family and friends!
No-bake Tiramisu Layer Cake
- Total Time: 0 hours
- Yield: Serves approximately 12 slices 1x
Description
Indulge in the delightful No-bake Tiramisu Layer Cake, a creamy and elegant dessert that beautifully encapsulates the classic Italian flavors of tiramisu without any baking required. This easy-to-make treat features layers of coffee-soaked ladyfingers and rich mascarpone cream, making it a perfect choice for any occasion—from casual family dinners to festive celebrations. With its luscious texture and charming presentation, this cake is sure to impress coffee lovers and dessert enthusiasts alike. Prepare it in advance to enhance the flavors, allowing you to enjoy more time with your guests.
Ingredients
- 250g ladyfingers
- 1–2 cups strong coffee (cold)
- 500g mascarpone cheese
- 150g sweetened heavy whipping cream
- 2 egg yolks
- 1 egg white
- 100g granulated sugar
- Dash of Marsala wine (or vanilla extract)
- 2 tablespoons cocoa powder
Instructions
- Cool strong coffee in the refrigerator.
- Separate eggs; whip egg whites until stiff peaks form.
- Whip egg yolks with sugar until thick.
- Combine mascarpone with Marsala wine until creamy.
- Whip heavy cream until firm; fold into mascarpone mixture.
- Gently combine whipped yolks and whites into the mascarpone mix.
- Dip ladyfingers in cooled coffee and layer in a springform pan.
- Alternate layers of ladyfingers and mascarpone mixture until all used.
- Refrigerate for at least six hours or overnight before serving.
- Prep Time: 30 minutes
- Cook Time: None
- Category: Dessert
- Method: No-bake
- Cuisine: Italian
Nutrition
- Serving Size: 1 slice (125g)
- Calories: 360
- Sugar: 24g
- Sodium: 90mg
- Fat: 24g
- Saturated Fat: 13g
- Unsaturated Fat: 9g
- Trans Fat: 0g
- Carbohydrates: 30g
- Fiber: 1g
- Protein: 5g
- Cholesterol: 60mg