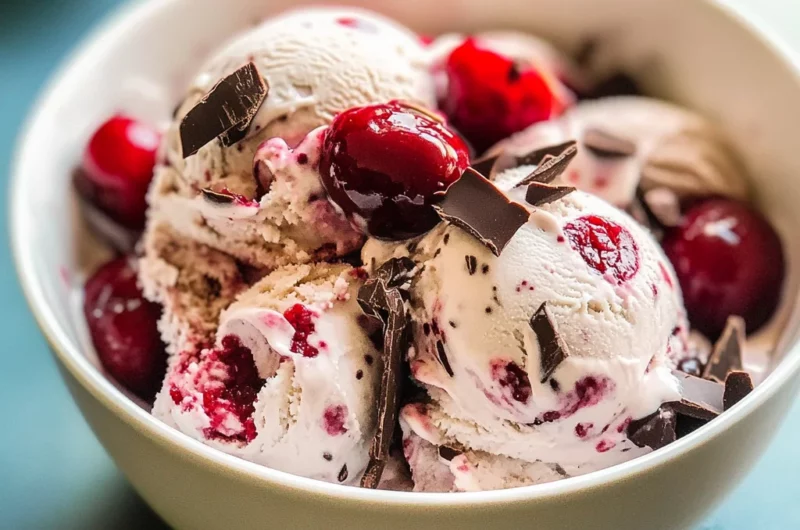
Packed with grated chocolate and fresh cherries, Ben & Jerry’s Cherry Garcia Ice Cream is a delectable treat that satisfies the cravings of chocolate and cherry lovers alike. Perfect for summer gatherings, birthday parties, or just a cozy night in, this ice cream brings joy to any occasion with its rich flavors and creamy texture. Let’s dive into this delightful recipe!
Why You’ll Love This Recipe
- Easy to Make: This recipe is straightforward and requires no special skills, making it perfect for beginners.
- Delicious Flavor Combination: The luscious blend of cherries and dark chocolate creates an irresistible taste.
- Customizable: Feel free to adjust the amount of cherries or chocolate to suit your preferences.
- Perfect for Any Occasion: Whether it’s a family gathering or a casual dessert night, this ice cream fits right in.
- Homemade Goodness: Enjoy the satisfaction of creating your own gourmet ice cream at home.
Tools and Preparation
Before you begin making your own Ben & Jerry’s Cherry Garcia Ice Cream, gather the necessary tools. Having everything ready will streamline the process and ensure success.
Essential Tools and Equipment
- Ice cream maker
- Medium saucepan
- Mixing bowls
- Whisk
- Measuring cups
Importance of Each Tool
- Ice cream maker: This machine churns the mixture to create a smooth texture while freezing it.
- Medium saucepan: Essential for heating the cream and milk mixture evenly without scorching it.
- Mixing bowls: Useful for separating ingredients and mixing them thoroughly.
Ingredients
Packed with grated chocolate and fresh cherries! A delicious ice cream for all the chocolate and cherry lovers!
Base Ingredients
- 1/2 cup shaved chocolate (Hershey’s Special Dark Chocolate Candy Bar)
- 1/2 cup fresh Bing cherries (halved and pitted)
You may use canned cherries, but drain the syrup first. - 4 large eggs
- 1 1/2 cups granulated white sugar
- 4 cups heavy or whipping cream
- 2 cups milk
How to Make Ben & Jerry’s Cherry Garcia Ice Cream
Step 1: Prepare Your Ingredients
- Place shaved chocolate flakes and prepared cherries in separate bowls.
- Cover tightly and refrigerate.
Step 2: Heat Milk and Cream Mixture
- In a medium saucepan, combine cream and milk over medium-low heat on the stovetop until warmed.
Step 3: Whisk Eggs and Sugar
- In a medium mixing bowl, whisk eggs until light and fluffy.
- Slowly add in sugar while whisking until fully combined; continue whisking for another 1-2 minutes. Set aside.
Step 4: Combine Egg Mixture with Cream Mixture
- When the cream/milk mixture reaches 140°F (60°C), remove from heat.
- Very slowly whisk about 1/3 of the hot cream/milk mixture into the egg/sugar mixture to temper the eggs.
Step 5: Complete Custard Mixture
- Once blended, pour in the remaining cream/milk mixture.
- Return custard to saucepan; heat on medium-low until it reaches 175°F (80°C). Remove from heat.
Step 6: Chill the Mixture
- Chill thoroughly until it cools down to a minimum of 40°F (4°C) to ensure optimal freezing.
Step 7: Freeze in Ice Cream Maker
- Transfer chilled mixture into an ice cream maker; freeze according to manufacturer’s instructions.
Step 8: Add Chocolate and Cherries
- When ice cream thickens (about two minutes before finishing), add grated chocolate and cherries.
Step 9: Final Freeze
- Continue freezing until ready. Serve soft or freeze for an additional 6-8 hours for harder consistency.
Enjoy your homemade Ben & Jerry’s Cherry Garcia Ice Cream, perfect as a treat or dessert!
How to Serve Ben & Jerry’s Cherry Garcia Ice Cream
Serving Ben & Jerry’s Cherry Garcia Ice Cream is as delightful as making it. This creamy treat pairs well with various toppings and accompaniments, ensuring each scoop is a flavor explosion.
Classic Sugar Cone
- A crunchy sugar cone adds a delightful texture that complements the creamy ice cream.
Waffle Bowl
- Serve in a waffle bowl for an edible dish that enhances the experience while adding a sweet crunch.
Hot Fudge Sauce
- Drizzle warm hot fudge over your ice cream for an indulgent chocolate boost.
Fresh Cherries on Top
- Garnish with fresh cherries to emphasize the fruity flavors and add visual appeal.
Whipped Cream
- A dollop of whipped cream creates a luscious layer that makes every bite even more enjoyable.
Nuts or Sprinkles
- Add chopped nuts or colorful sprinkles for extra texture and fun, perfect for kids and adults alike.

How to Perfect Ben & Jerry’s Cherry Garcia Ice Cream
Perfecting Ben & Jerry’s Cherry Garcia Ice Cream requires attention to detail and some helpful tips. Follow these suggestions for the best results.
- Use Fresh Ingredients: Fresh Bing cherries enhance the flavor significantly compared to canned options.
- Chill the Mixture: Ensure your custard mixture is thoroughly chilled before churning; this helps achieve a smoother texture.
- Don’t Rush Freezing: Allow the ice cream to freeze fully after churning for the best consistency.
- Experiment with Chocolate: Feel free to mix different types of chocolate for unique flavor combinations.
Best Side Dishes for Ben & Jerry’s Cherry Garcia Ice Cream
Pairing side dishes with Ben & Jerry’s Cherry Garcia Ice Cream can elevate your dessert experience. Here are some tasty options to consider:
- Chocolate Chip Cookies: Soft, chewy cookies provide a sweet contrast and are perfect for sandwiching your ice cream.
- Fruit Salad: A refreshing fruit salad balances the richness of the ice cream while adding a healthy touch.
- Brownies: Dense, fudgy brownies create a decadent pairing when served alongside this cherry-flavored delight.
- Pecan Pie: The nutty flavors of pecan pie harmonize beautifully with the fruity notes of Cherry Garcia.
- Cheesecake: A slice of creamy cheesecake offers a rich counterpart that complements the ice cream perfectly.
- Granola Bars: For a healthier option, granola bars provide crunch and are great for dipping into your ice cream.
Common Mistakes to Avoid
Making ice cream at home can be a delightful experience, but some common mistakes can ruin your Ben & Jerry’s Cherry Garcia Ice Cream. Here are some pitfalls to watch out for.
- Skipping the chilling step: Failing to chill your custard thoroughly before freezing can result in a grainy texture. Ensure it reaches at least 40° Fahrenheit.
- Not tempering the eggs: Adding hot cream directly to the eggs can scramble them. Always temper the eggs by gradually adding a bit of hot cream while whisking continuously.
- Using warm ingredients: If your mixture is too warm when you start churning, it won’t freeze properly. Make sure everything is cold before using your ice cream maker.
- Adding mix-ins too early: Mixing in chocolate and cherries too soon can lead to them sinking or being over-churned. Wait until the last couple of minutes of churning.
- Skipping the ice cream maker instructions: Each ice cream maker is different, so not following manufacturer guidelines can affect texture and consistency. Always read your machine’s manual.
Refrigerator Storage
- Store in an airtight container for up to 3 days.
- Ensure it is fully cooled before transferring to avoid condensation.
Freezing Ben & Jerry’s Cherry Garcia Ice Cream
- Freeze in a well-sealed container for up to 2 weeks for optimal freshness.
- For best results, use a container that minimizes air exposure.
Reheating Ben & Jerry’s Cherry Garcia Ice Cream
- Oven: This method isn’t recommended as it will melt unevenly and could cook the ice cream further.
- Microwave: Use low power and heat in short intervals (10-15 seconds) to soften slightly without melting completely.
- Stovetop: Place in a pan on low heat, stirring constantly until just softened.
Frequently Asked Questions
What is Ben & Jerry’s Cherry Garcia Ice Cream?
Ben & Jerry’s Cherry Garcia Ice Cream is a popular flavor that combines rich cherry ice cream with chunks of chocolate and real cherries.
How long does it take to make Ben & Jerry’s Cherry Garcia Ice Cream?
The total time for this recipe is about 480 minutes, which includes preparation and freezing time.
Can I use frozen cherries instead of fresh?
Yes, you can use frozen cherries, but make sure they are thawed and drained before adding them to your mixture.
How do I customize my Ben & Jerry’s Cherry Garcia Ice Cream?
You can customize this recipe by adding nuts, using different types of chocolate, or even swirls of fudge for added flavor.
Is homemade ice cream healthier than store-bought?
Homemade ice cream can be healthier since you control the ingredients and can reduce sugars or fats according to your preferences.
Final Thoughts
This Ben & Jerry’s Cherry Garcia Ice Cream recipe is not only delicious but also versatile. You can easily customize it with your favorite mix-ins or flavors. Whether you’re serving it at a party or enjoying it on a quiet evening, this treat will surely impress everyone. Give it a try today!

Ben & Jerry’s Cherry Garcia Ice Cream
- Total Time: 45 minutes
- Yield: Approximately 8 servings 1x
Description
Indulge in the creamy delight of homemade Ben & Jerry’s Cherry Garcia Ice Cream, a classic treat that combines luscious cherry flavors with rich, dark chocolate. Perfect for summer gatherings or cozy evenings, this easy-to-make recipe invites you to create a gourmet dessert right in your kitchen. With its smooth texture and customizable ingredients, every scoop is a delightful experience that will satisfy your sweet cravings. So grab your ice cream maker and let’s get started on this delicious journey!
Ingredients
- 1/2 cup shaved chocolate (Hershey's Special Dark Chocolate Candy Bar)
- 1/2 cup fresh Bing cherries (halved and pitted)
- 4 large eggs
- 1 1/2 cups granulated white sugar
- 4 cups heavy or whipping cream
- 2 cups milk
Instructions
- Prepare cherries and chocolate by placing them in separate bowls, covering tightly, and refrigerating.
- In a medium saucepan, warm the cream and milk over medium-low heat.
- In a mixing bowl, whisk eggs until fluffy; gradually add sugar while whisking until fully combined.
- Temper the eggs by slowly adding some of the hot cream mixture while whisking continuously.
- Combine the egg mixture with the remaining cream mixture in the saucepan; heat until it reaches 175°F (80°C), then remove from heat.
- Chill the custard mixture to below 40°F (4°C).
- Pour into an ice cream maker and churn according to manufacturer instructions.
- When thickened, add chocolate and cherries, then continue freezing until desired consistency is achieved.
- Prep Time: 30 minutes
- Cook Time: 15 minutes
- Category: Dessert
- Method: Churning
- Cuisine: American
Nutrition
- Serving Size: 1/2 cup (125g)
- Calories: 370
- Sugar: 26g
- Sodium: 60mg
- Fat: 22g
- Saturated Fat: 14g
- Unsaturated Fat: 6g
- Trans Fat: 0g
- Carbohydrates: 36g
- Fiber: 1g
- Protein: 5g
- Cholesterol: 160mg